I am ecstatic! I have finally purchased Zbrush since I have missed using it so much! I have to relearn it but I'm hoping it will go faster than my first time learning it. I hope to share many creations and progress shots on here!
Tuesday, 15 August 2017
Sunday, 8 January 2017
Glue for Vinyl
I just thought that I'd share what glue I used for my vinyl cat! It sticks vinyl to paper very well which a lot of glues struggle with. It's LePage Pres-TITE contact cement. The one I have is in a little tube and it worked wonders. A picture will be uploaded soon!
Monday, 5 December 2016
Self Supporting Object with Partner Remix: 3D PRINTED
So here is the second part to the first blog! We chose our object and now have gone to print it!
This was the object of choice!:


This was the object of choice!:

(Pic borrowed from Matthew's blog: http://obdfretroradio.blogspot.ca/)
It remixes both of our ideas because it combines the complex features of the chosen object from his side and the more vase like appearance of mine as well as the cutout portion!
It was 3D printed, however we had to simplify the complexity of the shapes within the cut of the vase so the 3D printer would get that detail!!


This project was really fun and interesting! The limits we were given were both difficult and interesting to work in. A big issue for us was maintaining the complexity while having it physically possible to be made. With some adjustments and tweaks we finally go this product!!
Sunday, 27 November 2016
Self Supporting Partner Remix
Alright so as a continuation from Self Supporting Concept Generation I have since partnered up with Matthew Merrit (http://obdfretroradio.blogspot.ca/) to remix our best ideas and concepts. This project in general is about creating an open top vessel that is self supporting with a single perimeter. Why is self support important here? Well there are two main reasons, one is that if we were to create an object that was to not be self supporting we would require support material in order to create it. This is a waste of resources. Another reason is that it creates limits and requires you to do a little thinking.
Now the term self supporting is a little different than the normal usage, it does not only mean that it can stand on its own, it also means that the 3D printer can build it without support. The way a 3D printer works is that it essentially cuts your 3D model into many layers and draws on individual layers. The difficulty created, especially with a single perimeter having it so that the printer only draws the perimeter and not the layer of the area, is that if one layer juts too far out from the rest of the model the plastic will simply fall to the base. That is exactly what we are trying to avoid. Some of these models below may require to be stretched so as to avoid this. Minor curves can often work but its all about the angles.
So when Matthew Merrit and I met up, and the first thing we did was picked one of our favourite/most functional object from each concept generation collection. The main two were:Matthew's:

Mine:

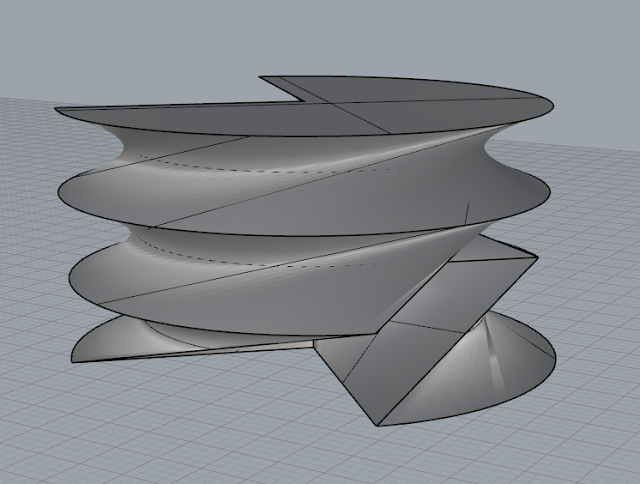
But we both liked some of the other features integrated in our other objects. One of which was a twisting design as seen in some of mine:

As well as the roundedness and design of his!:
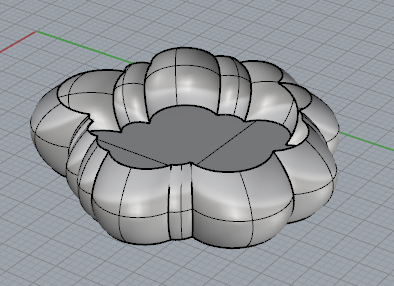
We really liked the geometric pattern of the top one but we also liked the vase shape of the second. We also both agreed that the sudden cutout was really cool. We also thought that it would be interesting to combine the twisting shapes into our design, and maybe experiment with making the cutout would twist with the pattern.
At this point we decided to split up and experiment on our own. We are going to meet up next class and discuss what worked and what did not and finally either decide on one to go forward with or tweak. I worked on the number of layers, some had three and some had too many to count. I also played with the cut in the piece. I tried to also fiddle around with the shape of it! I had a lot of fun just messing around with our pieces.
It was really interesting to push the program and see just how unique, intricate and unique we could make the objects! Some of the struggles, especially with integrating the complex patterns, is that some of the pattern would intersect itself which would only work to confuse the 3D printer.
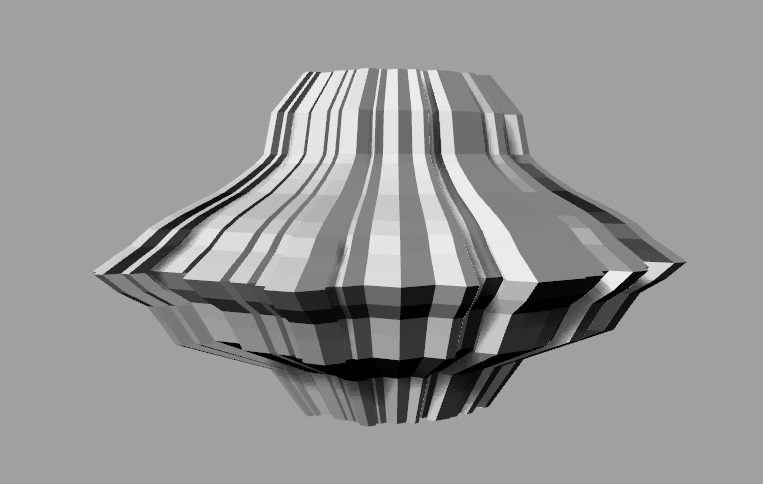
Example of the number of layers used to create the shape

To create these shapes, I made some templates from our two models to help me out! I would use the pacman to help cut out shapes from the second, and would layer these shapes to create the vessels! It made the brainstorming of designs a lot faster and easier to tweak!


As for the brainstorming itself here are the ones that did not intersect themselves of mine:


These are Matthew's! Check out his blog to see his side of this! http://obdfretroradio.blogspot.ca/

Monday, 21 November 2016
Caterus has returned!
Back a couple of posts ago I created a remix called Caterus! Here you can see him in his natural habitat, at Charon's (AKA the River-Man) house at the gates of Tartarus! The River-Man's personality is showing through his house. You can see that he has some beer cans and a life/death/party clock. Death is a party-goer and when he's not partying or leading the souls of the dead he parks his boat in his new garage and spends time with this gate guardian reject.
I did this project in design drawing. I didn't want to see Caterus disappear so I had to bring him back. I'm hoping to clean up this piece and ink it as well as colour and shade it.

Self Supporting Concept Generation
Here I generated ten concepts to later combine with another person's! After this process we will be 3D printing the combined models! For now here are some of my ideas!


In the end some came out looking better than others. I struggled a little bit in trying to make them all different and interesting but after a bit of experimenting I began to get more unique and interesting ideas! Beforehand I didn't push the boundaries as much as I would have liked to. Only near the end did I realise how much I really could push the boundaries. I would really love to learn how to add a lattice structure at some point. But that is some experimentation on my part for another day.
Monday, 14 November 2016
Skeletal Kitty Final Rendition!
Here is the third and final version of the skeletal kitty complete with a schematic and pictures!


I didn't make many adjustments at this point mostly because I was superbly happy with how prototype 2 came out! I learned a technique for applying the glue which mostly works, however the glue I use likes to dry out fast, which is both a blessing and a curse. Some of the biggest problems came in the order of assembly. The head and tail were tough to apply when all the pieces were separately done, so I ended up applying it to the body before I finished assembling it and it seems to work well. The head came out really well I'm happy to say, the eyes and nose fit perfectly, and I'm really glad that the little ectoplasm ears are kind of rounded because of the stiffness of the paper/vinyl not making a perfect fold. Overall I would say this was a success and I want to make more of him with more cat designs! One issue with the schematic was that I had to take it to staples to print and I found out a little too late that unfortunately I had rendered it at a slightly lower quality then I should have so it is a little pixelated. However, it still looks good, and I printed the cat design itself out without the pixilation. I think it's amazing that you can take something from the computer and make a paper version in real life. Really cool!
Subscribe to:
Comments (Atom)